How to Back Up an iPhone
Whether you’re getting ready to buy an iPhone or you’ve got an old one that you want to keep safe, you should know how to back up an iPhone. You can use the iCloud service or use iTunes, but either way you should be able to make sure that your data is secure. You’ll want to consider encryption for your local backups. And, if you’ve got a lot of data on your phone, you may want to consider scheduling regular backups to iCloud.
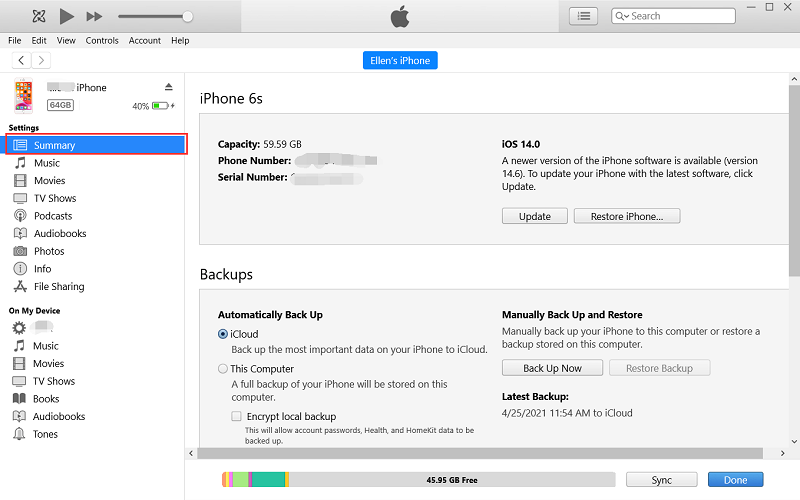
Backup your data with iTunes
Using iTunes to backup your data is a great idea. iTunes backups can restore your device without the need for a passcode. You will need to make sure that you have enough space on your computer’s hard drive. It will take a few minutes to backup your data.
You should also consider using iCloud to backup your iPhone. You can take advantage of the free 5GB of memory that iCloud provides. You can also pay for more storage.
The iCloud’s main feature is an automated backup. You can verify that your backup is active by tapping Settings -> iCloud -> Storage -> Manage Storage. You can also restore your data from an iCloud backup. It can also be used to retrieve deleted data.
One thing to keep in mind when using iCloud to backup your data is that it will consume a lot of bandwidth. If you are on a wireless network, you will need to enable a secure Wi-Fi connection. You can also opt for a wired connection if you are not on a wireless network.
The best way to backup your data is to make it a habit. You should backup your data at least once a week. This is the best way to ensure that you are not losing any important data. You should also make sure that you have a passcode for your device. This will prevent you from unlocking your iPad or iPhone.
The iCloud’s other main feature is the ability to store a massive amount of data in the cloud. This is ideal for backing up your photos and videos. You can also use this feature to store your text messages and voicemails.
Schedule regular backups with iCloud
iCloud is Apple’s service for backing up important data. It stores files in the cloud so that you can access them from any device. It also allows you to sync your content across devices and manage the content you’ve synced.
Apple has made a number of changes to iCloud. Some of these changes allow you to delete old backups. Others allow you to change how your content syncs across devices. You can also exclude specific apps from your iCloud account. You can also upgrade your iCloud account to a larger one. This gives you more storage space for your files.
If you want to schedule regular backups with iCloud, you need to set up your account. You can do this from the Settings app. You can then check the storage used by the apps you have. You can also use the iCloud Backup button to start a backup. You can also adjust the amount of time you want your backup to take. You can delay it by nine hours or wait until the next night.
When you start a backup, the process takes a few minutes. You’ll be able to see a graphical representation of your iCloud storage. The Backup button will also display the last time a backup was successful. You’ll also see the date the backup was last created.
If you want to delete an old backup, you’ll need to log in to your account. You can also check the size of the backup. If the backup is too big for your available storage, you can delete it. You can also stop iCloud backup from running at any time.
Back up your data with cellular data
Taking advantage of a cellular data connection to back up your data can be a smart move, as long as you don’t stray too far off the cellular lane. Cellular data is useful for backing up your files and apps, as well as keeping you connected when the power goes out. It also comes in handy in case your business needs to withstand a power outage.
There are several ways to back up your data using a cellular data connection. The most obvious is through a third-party application such as Apple’s iCloud. Another method is through Google’s backup app. The app allows users to back up their content over a cellular data connection. The best part is that it’s free.
While cellular data isn’t always available, it’s often faster than Wi-Fi. One major downside is that using a cellular data connection for backup purposes might require you to shell out for extra data if your connection is metered. This isn’t a problem when you’re traveling, but it could become an issue when you’re working on a budget.
Getting a cellular data connection isn’t for everyone, but it’s a useful way to keep your data and applications safe when you’re on the go. For instance, backups of your phone’s photos, notes, and contacts can be kept in various locations. It might even be a good idea to keep all of these files in sync so that you can find them if you need to.
Backing up your data is just one small step in a larger process that includes protecting your business, your inventory, and your customers. If you’re on the hunt for the best way to back up your data, keep these tips in mind.
Encrypt local backups
Whether you’re backing up your iPhone or iPad, you need to encrypt local backups for added security. An encrypted backup can include your personal settings, your website history, or even call history. Without an encryption password, you cannot access this information, nor can you restore it to another iDevice.
Encrypting your backup is the best way to keep your information safe. It’s especially important for business iPhones, which can contain sensitive company information. You can choose to back up your device manually, or automatically with iTunes.
To create an encrypted backup, you need to follow some easy steps. First, you need to make sure your device is connected to your computer. This may require a USB cable. You also need to have the latest version of iTunes installed on your machine. Luckily, iTunes supports encryption for backups.
When your device is connected to your computer, you can view the latest backup in iTunes. This will be the most recent backup, and will have the date and time displayed. You may also see a graph of the progress. You can see the steps that iTunes took to create your backup.
When you’ve completed the backup, you’ll be prompted to enter a password. This password is different from the Apple ID password. This password is stored on your device, and it’s important to create a strong password.
The iPhone’s default backup software, iMazing, uses the same password as iTunes. If you use a different backup software, you’ll need to use your backup password in order to restore your iPhone.
When backing up an iPhone, you should consider the best way to encrypt local backups. This will keep important information such as call history, your website history, and even your photos safe. You can choose to encrypt your backup manually, or automatically using your default backup software.
Restore your data with iCloud
Whether you are trying to recover data from an iPhone that has been damaged or you want to wipe your phone to restore it to factory settings, there are several ways you can restore your data with iCloud. However, there are some things you should know before you do.
First, you’ll need to connect your iPhone to your computer. If you are on a Mac, you’ll need to open the Finder. You’ll then be prompted to enter a password and sign in with your Apple ID. Once you’ve done that, you’ll be able to use the Finder to back up your iPhone.
Next, you’ll need to choose the type of backup you want to restore. There are two options available, one is a local backup, and the other is a iCloud backup. For an iCloud backup, you’ll want to choose the one that’s most recent. Once you’ve selected your backup, you’ll want to start the restoration process.
For an iPhone, you’ll want to make sure you have a strong Wi-Fi connection. If you’re using a phone with a weak connection, you may have problems with the restore process.
You’ll also need to sign into your iCloud account. You can sign in to your account by using a password or a passcode. If you use an encrypted backup, you’ll need to enter the decryption password. If you don’t know the password, you’ll need to contact Apple Support.
Finally, you’ll need to download any apps or other iCloud information you want to restore. The apps you download will depend on what you want to restore. You’ll also want to ensure you have power before you begin the restoration process.