How to Add Another Email to Your iPhone
Adding an email to your iPhone is a great way to make sure that you never miss an important message. When you set up your new email account, you’ll be able to send and receive emails right from your iPhone’s Mail app.
Set up an iCloud(r) account
iCloud is a cloud-based service that syncs data between your iPhone, iPad, and Mac. It also keeps track of purchases made on the iTunes Store and App Store. You can store music, photos, documents, and more on your devices. You can add more than one iCloud account so that you can access your data on multiple devices.
Setting up an iCloud account is easy on a Mac. You can access the iCloud Control Panel by clicking on System Preferences. You’ll find iCloud on the right sidebar. You can turn iCloud on or off.
You can add more than one email account to your iCloud account. To do so, you’ll need to follow some steps.
The iCloud Control Panel will ask you to enter your iCloud email address. The Mail app will also ask you to enter your email account. After entering your email, you’ll be prompted to enter your password. You’ll also need to turn off Mail.
Then, you’ll be asked whether you want to merge your iPhone data with iCloud. If you choose to merge your data, you’ll need to enter a passcode on your device to unlock it.
You can add another email account to your iCloud account by using Apple’s iCloud Control Panel. The account is tied to an Apple ID, which is the same account used to access iCloud. To set up another email account, you’ll need to enter a six-digit Apple ID Verification Code. The code is sent to a trusted device.
You can also create a secondary iCloud account so that you can manage purchases from the App Store, iTunes Store, and Newsstand. This is useful if you have more than one user in your family. You can share content with all members of your family, but you’ll need to set up each user’s iCloud account separately. If you need help setting up a secondary iCloud account, you can ask an Apple Genius at your local Apple Store.
Set up your iCloud account in less than a minute. You’ll need a new Apple ID and two-factor authentication (twoFA) code. You’ll also need to turn on iCloud on your iPhone.
Designate a Default Email Account for sending Messages from your iPhone
Changing your default email account can improve your email sending efficiency. The Mail app lets you set multiple email accounts. The first email account you set up will be your default account. This means that when you send an email from the Mail app, it will be sent from that account.
There are several ways to set up a default email account on your iPhone. This will help you avoid changing your email address every time you send an email.
You can set your default email account by going to Settings and selecting Mail. When you first set up Mail, you may have to select the language you want to use. Then, you can add or remove email accounts and change your send from address. You can also disable or delete email accounts from your iPhone. Once you have disabled an account, you won’t see that account in Mail.
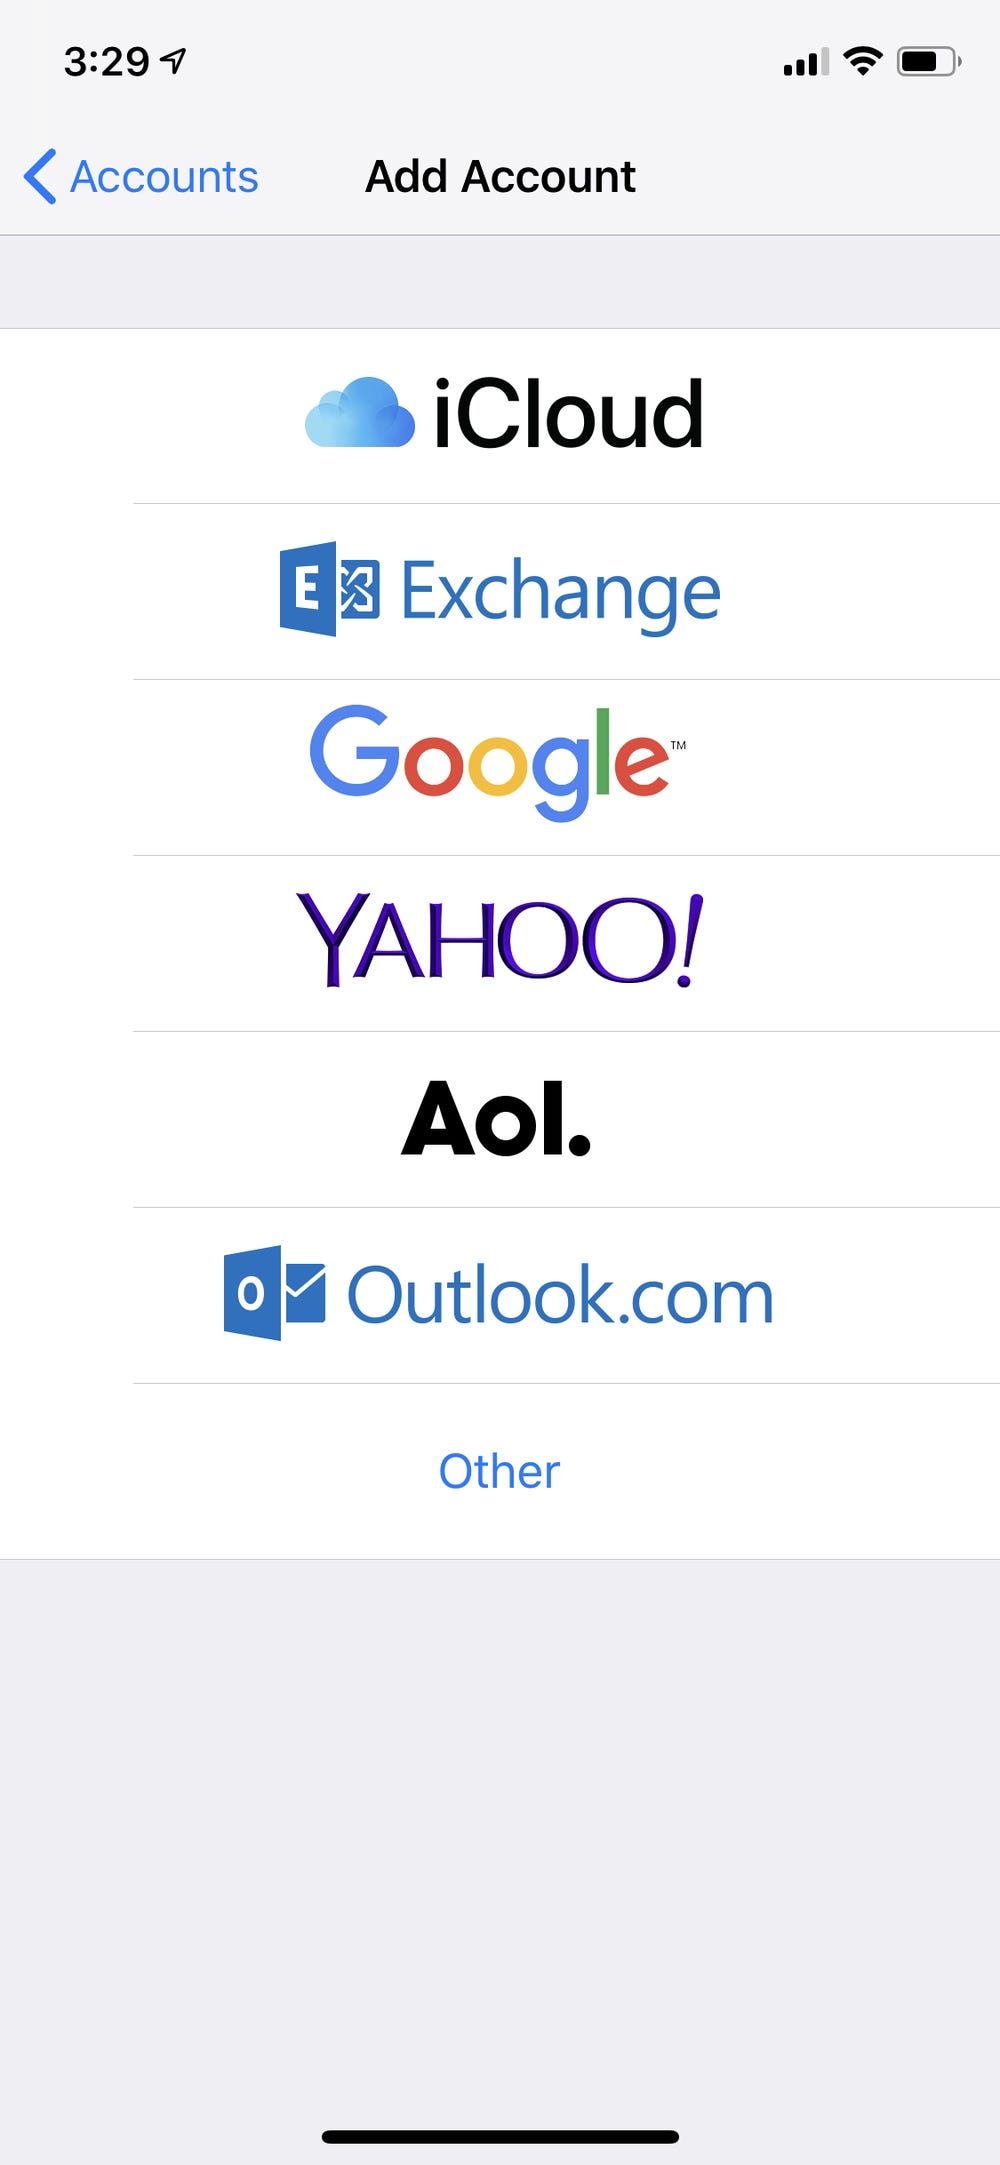
Another way to set up a default email account on your iPhone is by adding a new email account. You can add an account by going to Settings, selecting Mail, and selecting the Add Account button. You can also skip this step if you already have an email address in Mail. You can also change your default email account by going to Settings, selecting Mail, and changing your default account.
One of the best ways to set up a default email account on your iPhone is by going to Settings and selecting the Mail icon. This will open the Mail app and let you compose emails from all your email accounts. You can also customize the Mail app on your iPhone by launching it from the Home screen. You can also customize the Mail app with the iPad.
The Mail app is also useful for managing other emails from other services. For example, if you’re using Google Chrome, you can set it to email a link to a web page. Another useful feature is the Mail app’s ability to send links via iMessage. The same is true if you use a work email address on your iPhone.
Send emails from your iPhone’s Mail app
Using your iPhone to send emails can be done through either the built-in Mail app or using third-party email apps. You can also schedule emails to send later. This can be done in the Mail app, but you will need to have a stable internet connection to do it. You may also be able to use your iPhone’s iCloud account to send emails.
For example, you can add a contact to the Bcc or CC line in your email. You can also add recipients from your Contacts list. If you have the right email address for the recipient, you should see their name pop up. If you have a different email address for the recipient, you will have to create a new email and add them to the recipient list.
If you are using the built-in Mail app, it can be a hassle to send emails if you aren’t connected to Wi-Fi. You can check the outbox for your email to ensure that it’s being delivered. If it’s not, it’s probably a problem with the email service provider. If it’s a problem with the email service provider, you will need to get in touch with them.
Another problem that can prevent you from sending emails is a slow Internet connection. You may want to check the network settings to see if the Internet connection is fast enough. If it’s not, you can fix this problem by restarting your phone.
Another option is to manually refresh the email app. This can be done by swiping up on the Mail app card. Once you do this, you will be able to see your email accounts and if they are updated. If it’s not updated, you can also try to re-add the accounts and see if that helps.
For the best results, your iPhone should be running the latest iOS version. You should also make sure that Background App Refresh is enabled. If it isn’t, you can manually refresh the Mail app and re-add your email accounts. If this doesn’t work, try restarting your iPhone. If it still doesn’t work, you can try resetting the network settings.
Check your email provider’s settings
Adding an email account to your iPhone requires a few steps. First, you need to enter your email address, password, and name. Then you need to select whether you want to add the account to the calendar, contacts, notes, or reminders. You can also choose to manually set up the email server.
Once you’ve set up your email account, you can check your email for messages or send emails from the phone. It depends on your email service provider. Most email providers detect the proper settings automatically, but you can also manually set them up.
If you want to use your iPhone as a mail client, you need to set up your email accounts with POP (Post Office Protocol) or IMAP (Internet Message Access Protocol). If you use IMAP, you can read your email without downloading them. You can also set up your email account to sync with other apps on your iPhone. If you want to use POP, you need to have an iPhone and storage space.
If you don’t have an iPhone, you can add an email account with Gmail. However, Gmail does not support encrypted connections. If you want to use IMAP, you’ll need to set up your email account with Microsoft Exchange or another email service that supports IMAP. You can also use your email account to check for new messages, reply to them, or forward them to other email addresses.
If you don’t know how to set up an email account on your iPhone, you can ask your email service provider for help. You can also use the mail settings lookup tool to find out specific email settings.
The new account form requires you to input your email address, password, and description. You can also enter the incoming and outgoing mail servers. You can also add a user name, but a full email address is recommended.
You’ll also have to input the domain name of your email provider. If your email provider has a web portal, you’ll need to log in using that. If your email provider doesn’t provide web portal access, you can contact the email provider’s customer support.